
Info
Alle Bewertungen (432)
- tt-forever (12190)- Bewertung vom Käufer.Vor über einem JahrBestätigter KaufGreat communication. A pleasure to do business with.
- sw-tirm-4yft9t (1133)- Bewertung vom Käufer.Vor über einem JahrBestätigter KaufThank you!
- chco98 (1661)- Bewertung vom Käufer.Vor über einem JahrBestätigter KaufFast payment. Great eBayer. Thanks!!!
- gruv-entertainment (509294)- Bewertung vom Käufer.Vor über einem JahrBestätigter KaufGreat communication. A pleasure to do business with.
- second.sale (4958916)- Bewertung vom Käufer.Vor über einem JahrBestätigter KaufThank you for an easy, pleasant transaction. Excellent buyer. A++++++.
- ad_best1store (49)- Bewertung vom Käufer.Vor über einem JahrBestätigter KaufExcellent Buyer. Thank you for your purchase.
Rezensionen (6)

04. Apr 2016
Very difficult to build.
2 von 2 finden das hilfreich This is a great looking model but it is difficult to build because it has so many small piecesand it is diffcult to get them to all line up. It took about 14 hours to put together.
22. Dez 2017
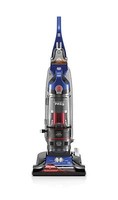
good suction but ......
2 von 2 finden das hilfreich On the pro side the vacuum has good suction, much better than my old Shark Navigator and it will pickup pine needles which my old vacuum would not do. It is heavier than my old vacuum but I can still manage it. I like that it is wider the the Shark. I also like the retractable cord.
On the con side the Hoover is very difficult to empty. The interior piece of the dirt basket is bell shaped and you have to reach your fingers up inside to get the carpet fibers and dirt out which becomes very messy with dirt falling all over the garage floor as you try to hold the trash bag and pull the carpet fibers out of the basket. If I had it to do over I wouldn't buy it for this reason alone.

01. Feb 2017
No instructions
There are no instructions in the package on how to install the motor so here is how I did it.
1. Remove the turntable top. There is a small screw in the middle of the turntable. Use a small straight blade screw driver and carefully lift of the turntable. This is the tricky part because there are 2 little spring loaded caps that pickup current for the tracks on the under side of the turntable. When you put the top back on use a little grease to hold them in place.
2. Remove the crank handle.
3 remove the 4 screws and lift the old top. The internal gears will probably lift out with the top.
4. Put the gears back in the bottom plate.
5. Install the new motor plate, replace the screws, replace the turntable top.